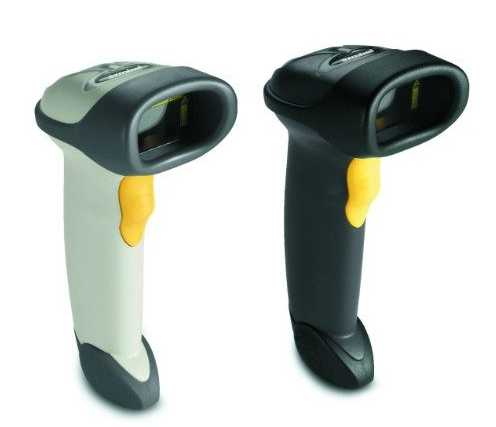
Introduction to GK888d™ Label Printer
Zebra® GK888d™ is the best value model of desktop label printers. The GK888d™ printer can provide a thermal printing speed of up to 4ips (inches per second) at a printing density of 203 dpi (dots per inch). GK888d™ supports ZPL™ and EPL™ Zebra printer programming languages and various interfaces and functional options.
GK888d printer function:
- The printer language can be automatically detected and switched between ZPL and EPL programming and multiple label formats.
- OpenAccess™ design that simplifies media loading.
- With color-coded operator controls and media guides.
- The on-board Simplified Chinese and Traditional Chinese font sets can be used for EPL (888 old font-GB-2312 and Big 5) and ZPL (GB18030-2000 and Big 5) programming.
- Zebra™ global printing solution—supports Microsoft Windows keyboard encoding and ANSI, Unicode UTF-8 and UTF 16 (Unicode conversion format), XML, ASCII (7 and 8 bits used by older programs and systems), single and double characters Section basic font encoding, hexadecimal encoding, and custom character mapping (DAT table creation, font linking and character remapping).
- Enhanced printer performance: faster printing speed, equipped with a 32-bit processor.
- Has a complete set of free software e-label applications and drivers, which can be used to configure printer settings, Design and print labels and receipts, get printer status, import graphics and fonts, send programming commands, update firmware, and download files. Copy printer settings and send graphics, files, fonts, and firmware (updates) via ZebraNet™ Bridge to one or more printers connected via Zebra® Ethernet and locally.
- The maintenance report function is enabled and can be customized by the user.
- GK888 thermal printer model also includes line mode printing support, which can support printing applications based on EPL1 legacy programming technology.
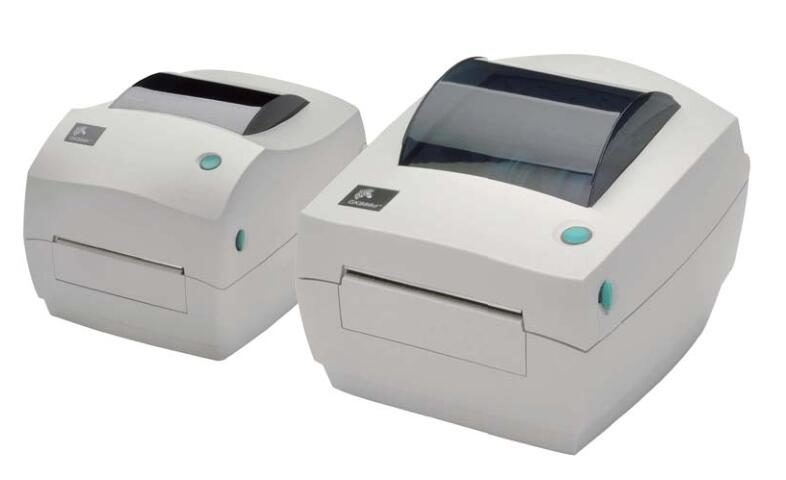
GK888t™ thermal printer
Zebra® GK888t™ is the best value model of desktop thermal printers. The GK888t™ printer can provide thermal transfer and thermal printing speeds of up to 4 ips (inches per second) at a printing density of 203 dpi (dots per inch).
GK888t™ supports ZPL™ and EPL™ Zebra printer programming languages and various interfaces and functional options.
The functions of GK888 printer are as follows:
- The printer language can be automatically detected and switched between ZPL and EPL programming and multiple label formats.
- Adopt the industry’s most convenient ribbon loading design.
- With color-coded operator controls and media guides.
- The on-board Simplified Chinese and Traditional Chinese font sets can be used for EPL (888 old font-GB-2312 and Big 5) and ZPL (GB18030-2000 and Big 5) programming.
- Zebra™ global printing solution—supports Microsoft Windows keyboard encoding and ANSI, Unicode UTF-8 and UTF 16 (Unicode conversion format), XML, ASCII (7 and 8 bits used by older programs and systems), single and double characters Section basic font encoding, hexadecimal encoding, and custom character mapping (DAT table creation, font linking and character remapping).
- Enhanced printer performance: faster printing speed, equipped with a 32-bit processor.
- A complete set of free software applications and drivers can be used to configure printer settings, design and print labels and receipts, obtain printer status, import graphics and fonts, send programming commands, update firmware, and download files. Copy printer settings and send graphics, files, fonts, and firmware (updates) via ZebraNet™ Bridge to one or more printers connected via Zebra® Ethernet and locally.
- The maintenance report function is enabled and can be customized by the user.
GK888 printer provides the following basic printer options:
- Label distribution (peeling).
- Universal media cutter
- Built-in 10/100 print server and Ethernet interface.
- Zebra® ZBI 2.0™ (Zebra BASIC Interpreter) programming language. ZBI™ allows users to customize printer operations that can be completed automatically, so that external devices such as scanners, scales, keyboards, Zebra® KDU or KDU Plus™ can be used without connecting to a PC or network.
This user guide provides all the information needed to perform the daily operation of the printer. To create a label format, please refer to the Programming Guide or a label design application such as E-Label™.
When connected to the host computer, this printer can be used as a fully functional label printing system.
Note: Many printer settings can also be controlled by printer drivers or label design software. For details, see the driver or software documentation.
GK888™ Label Printer Getting Started Guide
This chapter explains how to set up the printer for the first time and how to perform the most commonly used media loading steps.
Connect to power
- Set the printer power switch to the off position (downward).
- Plug the power cord plug into an applicable AC power outlet. Note: If the power switch on the AC power outlet is turned on, the power indicator will light up.
- Plug the power connector of the power supply unit into the power jack of the printer.
- Important note: Assemble the printer as needed so that the power cord can be easily operated. To ensure that the printer does not carry static electricity, the power cord must be separated from the power outlet or AC power outlet.
- Caution: Do not operate the printer and power supply components in a humid environment, otherwise it will cause serious personal injury!
Installation of GK888 label paper
- When loading media, roll media must be placed in the media supply rack.
- The correct media must be used for the type of printing required.
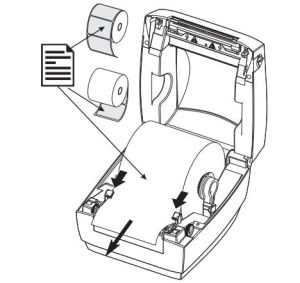
Prepare the media
Regardless of whether the media is wound inside or outside, it can be loaded into the printer in the same way. Remove the outer circle of the medium. Rolled media may be contaminated with dust or dirt during transportation, handling, or storage. Remove the outermost circle of media to prevent sticky or dirty media from being caught between the print head and the print roller.
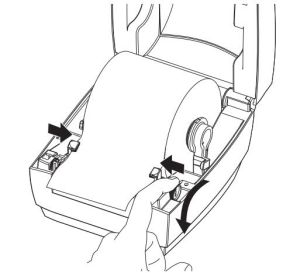
Put the roll of media into the media compartment
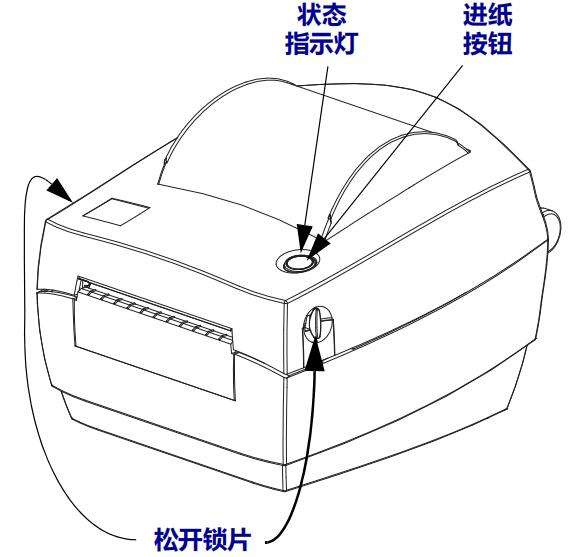
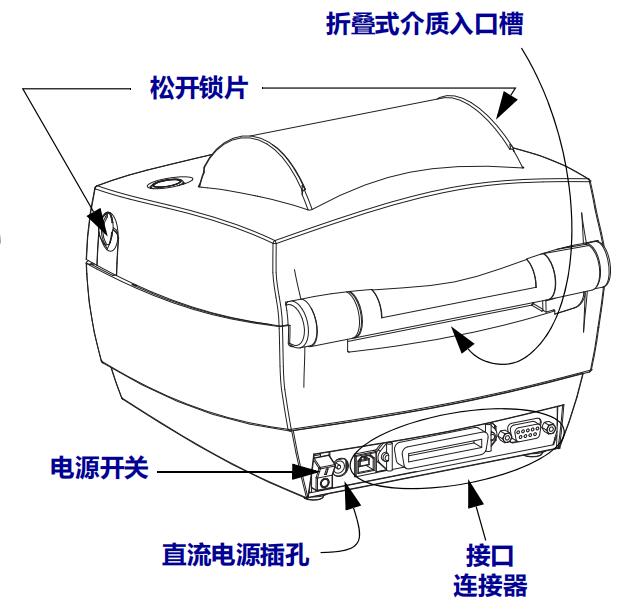
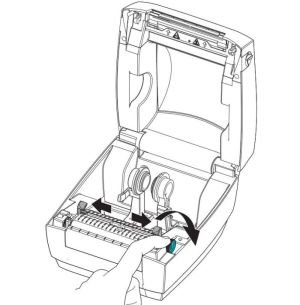
- Open the printer cover. Note: You need to pull the lever that releases the lock plate toward the front of the printer.
- Turn the media guide adjustment knob toward the back of the printer to open the media guide.
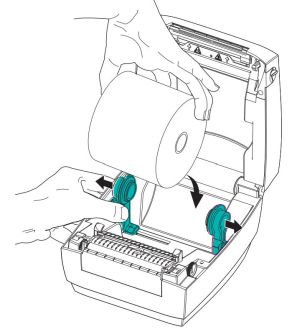
- Using the other hand, pull the media roll holder apart, place the media roll on the paper roll holder, and loosen it. Adjust the direction of the roll media so that the printing side is facing up when passing over the printing (drive) roller.
- Pull the media so that it protrudes from the front of the printer. Pass the media through the media guide. Make sure that the media roll can rotate freely. Do not put media rolls in the bottom of the media compartment. Check if the printing side of the media is facing upwards.
- Turn the guide adjuster knob to the front and close the media guide. The guide plate should just touch the edge of the media, but it should not restrict its movement.
- Close the printer cover. Press down until the top cover locks with a click.
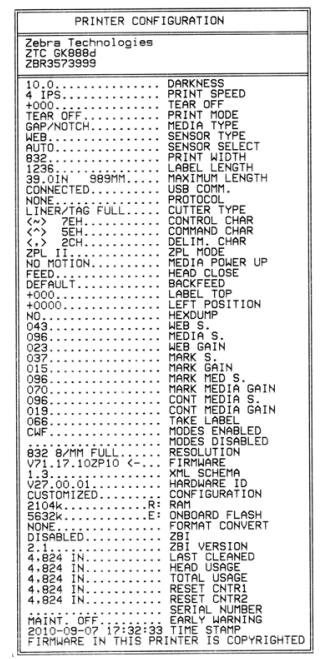
Print test (printer configuration) label
Before connecting the printer to the computer, make sure that the printer is in normal working condition. You can print a configuration status label to confirm.
- Make sure that the media is installed correctly and the top cover of the printer is closed. If the printer has not been turned on, turn it on. If the status indicator flashes green during the printer initialization process (pause mode), press the “Feed” button to set the printer in Ready (printable) mode. If the printer’s status light does not turn solid green (ready), see “Troubleshooting.”
- Press the “Feed” button two or three times to let the printer perform calibration according to the loaded media. During this process, the printer may feed multiple labels.
- When the status light is solid green, press and hold the “Feed” button until the status light flashes once.
- Release the “Feed” button. A configuration label will be printed out. If you cannot print this label, please refer to the “Getting Started”.
Pre-installed Windows® printer driver
- For Windows-based PC operating systems, Zebra has changed the way the printer is installed and used. We recommend that ZebraDesigner™ Windows® drivers be installed at least to take advantage of Windows XP® SP2 and subsequent versions of Windows. The system has the advantages of simplicity and ease of use.
- Zebra offers the Zebra Setup Utilities (ZSU) kit, which includes Zebra® printer drivers, utilities, and communication and installation tools that can be used with most Windows PC operating systems. The Zebra Setup Utilities and Zebra Windows printer drivers can be obtained from the user CD, or the latest version can be obtained from the Zebra website.
- ZebraDesigner™ driver and Zebra Setup Utilities (including driver): Supports Windows7®, Windows Vista®, Windows XP®, Windows® 2000®, Windows Server® 2008 and Windows Server® 2003 operating systems. The driver supports 32-bit and 64-bit Windows operating systems and has been certified by Microsoft. The Zebra Setup Utilities and ZebraDesigner drivers support the following printer communication interfaces: USB, parallel, serial, wired and wireless Ethernet, and Bluetooth (using the Bluetooth virtual printer port).
- First install Zebra Setup Utilities, and then power on the printer connected to the PC (the PC runs the Windows operating system supported by the Zebra driver). Zebra Setup Utilities will prompt you to connect power to the printer. Continue to perform the following steps to complete the printer installation.
Plug and Play (PnP) printer detection and Windows® operating system
- The newer Windows operating system can automatically detect the printer when it is connected via the USB interface. Depending on the hardware configuration and Windows version, the printer can be detected by plug-and-play when it is connected to the USB, parallel, and serial port interfaces. The printer driver currently does not support plug-and-play installation of the serial port. It must support the printer’s parallel port PC interface configuration and have two-way communication for plug-and-play operation.
- When you connect the printer to the PC for the first time, the operating system will automatically start the “Add New Hardware” wizard. If the Zebra Setup Utility comes with a pre-installed driver kit, the printer driver will be installed automatically. Go to the Windows printer directory, click the right mouse button, and select “Properties”. Click the “Print Test Page” button to verify the installation is successful.
- If you reconnect the printer to the USB port or turn on the printer after the PC has restarted the operating system, the Windows operating system will detect and reconnect the previously installed printer. Ignore the warning that a new device has been detected and close the taskbar prompt. Wait a few seconds for the operating system to match the printer and driver software. The warning message will exit, and the printer is now ready to print.
Universal Serial Bus (USB) device communication
When using the USB interface, the printer is a terminal device (not a host or hub). For more information about this interface
, please refer to “USB Specification”.
Note • Scanners, weighing equipment, or other data input (terminal) devices must use the serial port (not the
USB port) to send data to the printer.
Serial port and Windows® operating system
Except for the data flow control settings, the Windows operating system default settings used for serial port communication match the printer’s default settings. The default data flow control setting for Windows is NONE. The printer needs to set the data flow control to Hardware.
Note • The printer does not currently support Plug and Play (PnP) device detection for Windows ® serial ports.
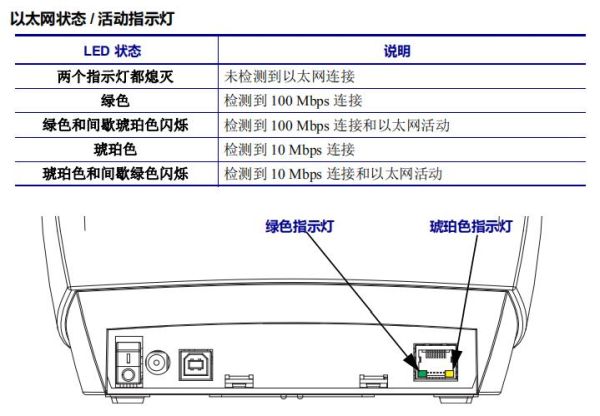
Ethernet
The options of this printer have various methods and tools to help Zebra network printers connect and configure on LAN (Local Area Network) or WAN (Wide Area Network). The Zebra Setup Utility configuration wizard supports the use of the printer’s IP address to create a printer connection in a shared network with a Windows-based system. The printer has an internal web page, which can easily complete the configuration of the printer and the network. Use a web browser to access these web pages through the printer’s IP address. The free version of ZebraNet™ Bridge software enables users to centrally deploy, manage and monitor Zebra® printers through Zebra® printers, and discover up to 3 printers from a single PC screen anywhere on the global network. ZebraNet™ Bridge Enterprise can be purchased to manage a large number of Zebra® printers.
Connect the printer to the computer
The printer supports a variety of different interface options and configurations. These include: Universal Serial Bus (USB) interface, RS232 serial interface, parallel interface (IEEE 1284.4) and 10/100 Ethernet.
- USB, serial and parallel ports
- Optional accessories: USB and Ethernet (wired)
Zebra Setup Utility is dedicated to assist users in installing these interfaces. The following pages will discuss the cables and special parameters of each physical communication interface of the printer to assist users in completing configuration settings before and after connecting to the power supply. The Zebra Setup Utilities configuration wizard will prompt the user to turn on the printer at an appropriate time to complete the printer installation.
Caution • When connecting the interface cable, set the power switch to the OFF position. Before connecting or disconnecting the communication cable, the power cord must be plugged into the power supply unit and the power outlet on the back of the printer.
Interface cable requirements
Data cables must be fully shielded and equipped with metal or metalized connector housings. To prevent radiation and receiving electrical noise, shielded cables and connectors must be used.
To minimize the level of electrical noise pickup in the cable, you should do the following:
- The shortest possible data cable should be used (1.83 m [6 ft] cable is recommended).
- Do not tightly bundle data cables and power cords together.
- Do not tie the data cable to the power cord conduit.
Important Reminders • This printer uses a fully shielded data cable, which complies with the FCC “Regulations and Rules” Chapter 15 for Class B equipment. If unshielded cables are used, it may cause radiation emission levels to exceed the limits for Class B equipment.
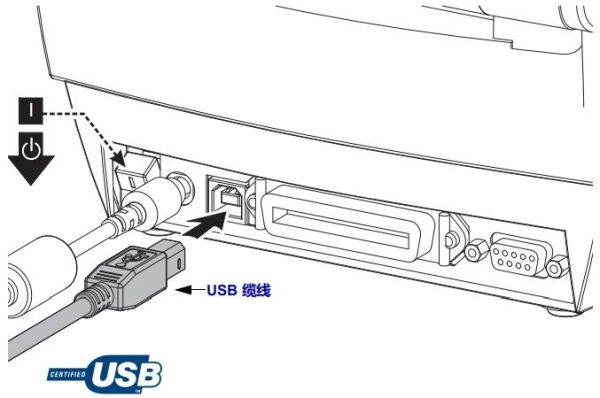
USB interface requirements
Universal Serial Bus (2.0 compatible) provides a high-speed interface compatible with existing PC hardware. The USB uses a “plug and play” design for easy installation. Multiple printers can share a USB interface/hub.
If you want to use a USB cable (not provided with this printer), you should check the cable and the cable package for the Certified USB™ mark (as shown in the figure below) to ensure compliance with USB 2.0 specifications.
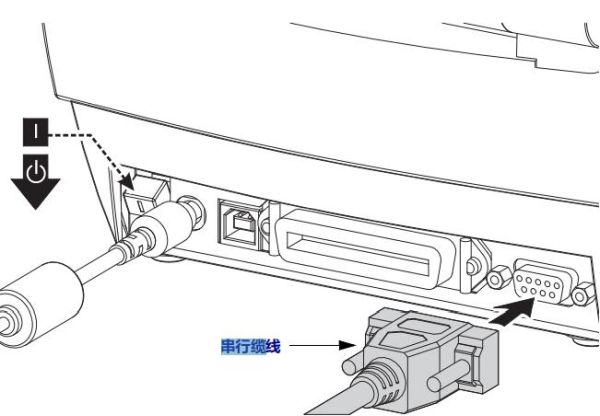
Serial communication
GK888 is equipped with a DCE serial communication port for hardware compatibility with older 888 printers. The required cable must have a nine-pin D-type (DB-9P) plug on one end that can be plugged into the mating (DB-9S) serial port on the back of the printer. The other end of the signal interface cable should be connected to the serial port of the host computer. This cable is a null modem (cross-signal connection) cable. Refer to “Appendix A” for pin information.
The serial port communication settings between the printer and the host (usually a PC) must match to ensure reliable communication. The most common settings that are changed most often are bits per second (or baud rate) and flow control. The host (usually a Windows PC) needs to change the data flow control to match the printer’s default communication method: the hardware is marked by the “Host
Handshake” setting DTR/Xon/Xoff. Depending on the non-Zebra application software or serial cable type in use, the hardware (DTR) and software (Xon/Xoff) mode combination may need to be changed.
The serial communication between the printer and the host computer can be set up in the following ways:
- Automatic baud rate synchronization
- ^SC command of ZPL programming
- Y command for EPL programming
- Reset the printer to the default printer configuration.
Baud rate is automatically set
The baud rate synchronization process enables the printer to automatically match the communication parameters of the host computer. To set the baud rate automatically:
- Press and hold the “Feed” button until the green status indicator flashes once, twice, or three times.
- When the status indicator is flashing, send the ^XA^XZ command sequence to the printer.
- When the printer and the host are synchronized, the indicator light will remain green. (The label will not be printed during the automatic baud rate synchronization process.)
ZPL ^SC command
You can use the “Set Communication” (^SC) command to change the printer’s communication settings.
1. If the communication settings of the host computer are the same as the printer, you can send the ^SC command to change the printer to the required settings.
2. Change the settings of the host computer to match the new printer settings.
For more information about this command, please refer to “ZPL Programming Guide“.
EPL Y command
Use the serial port setting (Y) command to change the communication settings of the printer.
- If the communication settings of the host computer are the same as the printer, you can send the Y command to change the printer to the desired settings. Note: The Y command does not support the setting of data flow control, and Xon/Xoff should be used to perform this setting.
- Change the settings of the host computer to match the new printer settings.
For more information about this command, please refer to “EPL page mode programming Guide“.
Reset the default serial port parameters
Perform the following steps to reset the printer’s communication parameters to factory defaults (serial communication settings are: 9600 baud, 8-bit word length, no parity, 1 stop bit, and DTR/XON/XOFF data Flow control).
- Press and hold the “Feed” button until the green status indicator light flashes once, wait a while, the indicator light will flash again, and then immediately release the button before flashing for the third time.
- When the status indicator is flashing amber and green quickly, press the “Feed” button. The serial communication between the printer and the host computer can be set through the ZPL ^SC command or the EPL Y command.
Note• The default serial port settings for earlier models of Zebra® printers running the EPL programming language are as follows:
9600 baud, no parity, 8 data bits, 1 stop bit, “hardware” and software ( Consolidation) Data control (actually DTR/Xon/Xoff). Windows operating system flow control settings are Hardware for most applications.
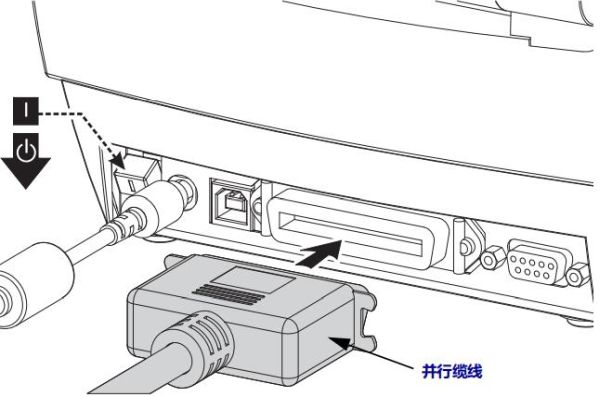
Parallel port
One end of the required cable must be a 25-pin D-type (DB-25P) plug (host), and the other end (printer) must be a “Centronics” interface (IEEE 1284 A-B parallel interface specification).
Ethernet
The printer requires a CAT-5 or higher UTP RJ45 Ethernet cable.
For more information on configuring the printer to operate on a compatible Ethernet network, please refer to the ZebraNet® 10/100 Internal Print Server Manual. The printer must be configured to work in a LAN (local area network) or WAN (wide area network). Access the printer’s onboard print server through the printer’s web page.
After connecting the printer
Now you can achieve basic communication with the printer, and test the printer communication, and then install other printer-related applications, drivers or utilities.
Execute printing to test the communication situation
Checking the operation of the printing system is a relatively simple task. For Windows operating systems, the Zebra Setup Utility or the Windows “Printers and Faxes” control panel can access and print test labels. For non-Windows operating systems, you can use a (~WC) command to copy the basic ASCII text file to the printer and print the configuration status label.
Test printing using Zebra Setup Utility:
- Open the Zebra Setup Utility.
- Click the newly installed printer icon, select the printer and activate the printer configuration button under the printer in the window.
- Click the Open Printer Tools button.
- In the Print tab window, click the Print configuration label line and click the Send button. The printer will print a configuration status label.
Use the Windows “Printers and Faxes” menu to test the printing situation:
- Click the Windows Start menu button to go to the Printers and Faxes menu or the Printers and Faxes menu of the Control Panel. Open the menu.
- Select the newly installed printer icon, select the printer, and click the right mouse button to open the printer’s Properties menu.
- From the General tab window of the printer, click the Print Test Page button. The printer will print a Windows test print page.
Use the MS-DOS command prompt or from the Windows XP “Start” menu to perform a test print on an Ethernet printer connected to the network (LAN or WAN):
- Use the following three ASCII characters to create a text file: ~WC
- Save the file as: TEST.ZPL (any file name and extension).
- Read the IP address on the network status printout of the printer configuration status label. On the system connected to the LAN or WAN network where the printer is located, click the address bar of the Web browser window and enter: fpt (IP address) (when the IP address is 123.45.67.01, it should be: ftp 123.45.67.01)
- Enter the word’put’, then enter the file name, and press Enter. For this “test print” file, the file name should be: put TEST.ZPL. The printer will print a new “Print Configuration Status” label.
For non-Windows operating systems, use the copy ZPL command file to perform test printing:
- Use the following three ASCII characters to create a text file: ~WC
- Save the file as: TEST.ZPL (any file name and extension).
- Copy the file to the printer. For the DOS environment, to send files to a printer connected to the system’s parallel port, the command is very simple:
COPY TEST.ZPL LPT1
Other interface connection types and operating systems use other command strings. For detailed instructions on copying files to the corresponding printer interface to perform this test, see operating system documentation.